How to learn sheet music with a child?
Contents
- Stage 0 – getting basic ideas about high and low musical sounds
- Stage 1 – pronouncing the names of the notes aloud
- Stage 2 – ladder on the piano
- Stage 3 – recording notes on the stave
- Stage 4 – study of the treble clef and the arrangement of notes on the staff
- Stage 5 – work with the “musical alphabet”
- Stage 6 – developing the skill of reading music
- Stage 7 – consolidation of knowledge
If you want to learn music on your own or with your child, then first of all, you should get an idea of what exactly music is. The fact is that notes are recorded sounds. Just like in speech, letters are written sounds. And therefore, both in language and in music, you first need to get at least a little familiar with the sounds, and only then with their styles.
This mini-guide suggests a way to learn music notes in a series of steps. The manual is suitable both for teaching children and for self-teaching adult musical notation.
Stage 0 – getting basic ideas about high and low musical sounds
Music is an art, and each of the arts speaks its own language. So, the language of painting is colors and lines, the language of poetry is words, rhythms and rhymes, movements, beautiful postures and facial expressions are important for dance. The language of music is musical sound. So, we repeat once again that only a musical sound recorded on paper is called a note.
There are a lot of musical sounds, they are different – high and low. If you build all the sounds in a row, starting with low sounds and up to the highest, you get a musical scale. In such a scale, all sounds lined up as if “by height”: low ones are big, tall notes, like cubs, and high ones are small, like birds and mosquitoes.
So, the scale can be large in composition – the sounds in it are just a sea. For example, on the piano keyboard, you can take and play as many as 88 sounds. Moreover, if we play the piano in a row, then it seems to us that we are climbing the steps of the musical ladder. Try it and listen for yourself! Do you hear? This is a very valuable experience!
Advice! If you don’t have a piano instrument or any of its analogues (synthesizer) in your house, then look for a virtual keyboard for yourself or install the Piano application on your phone.
Stage 1 – pronouncing the names of the notes aloud
So, there are a lot of sounds in the scale, but there are 7 main ones – this is DO RE MI FA SOL LA SI. You already know these names, don’t you? These 7 sounds are constantly repeated, only at a new height. And each such repetition is called an octave.
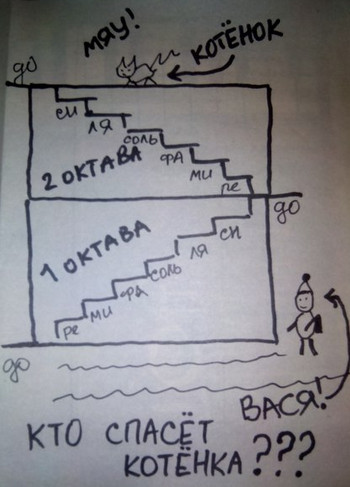
The scale, divided into octaves, in which 7 sounds are constantly repeated, resembles a multi-storey building in its structure. Each new octave is a new floor, and the seven basic sounds are a musical staircase from one floor to the next.
Recommended! If you are working with a child, start an album – a regular sketchbook or even just a folder for drawings.
Be sure to do this exercise. Draw a multi-storey building on the sheet, inside there are ladders of seven steps. And now, turn on your imagination and come up with some story for the child – for example, about the pioneer Vasya, who decided to help the kitten that climbed into the attic. Your goal is to go up and down the musical ladder several times in a row.
The fact is that the row “do-re-mi-fa-sol-la-si”, as a rule, is easily pronounced by all children, but in the opposite direction “si-la-sol-fa-mi-re-do ‘ are very few. This exercise will easily correct this matter, and correcting it is very important!
For the same purpose, you can use the well-known “counters”:
Do, re, mi, fa, sol, la, sy – The cat got into a taxi! Si, la, salt, fa, mi, re, do – The cat got on the subway!
Stage 2 – ladder on the piano
Now we need to turn to the piano again, it is important to establish auditory associations. Exercise with ladders must be done at the piano, with real sounds. At the same time, the arrangement of notes on the piano keyboard is remembered along the way.
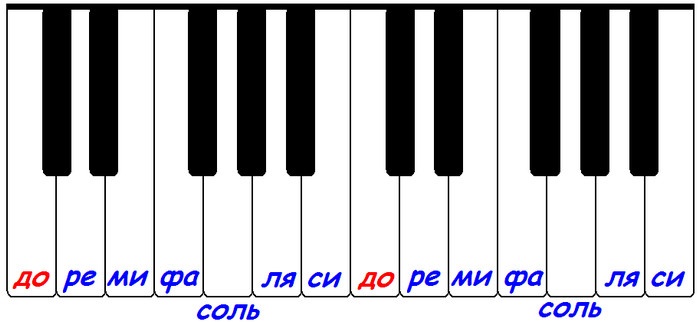
What is this location? The piano has white and black keys. All whites go in a row without any special features in their order. But the black ones go in small groups – then two keys, then three, then two, then three again, and so on. You need to navigate on the piano keyboard by the black keys – where there are two black keys, to the left of them, at the bottom “under the mountain” there is always a note DO.
Then you can ask the child (and the adult – ask himself) to find all the notes of DO on the keyboard, and it is important not to confuse them with the FA keys, which will occur at the beginning of groups of three black keys. Then, from the note DO, you can line up a series of all the other sounds and play this series up and down. You can read more about the arrangement of notes and octaves on the piano HERE.
Stage 3 – recording notes on the stave
There are special notebooks for writing letters and numbers – in a cage or in a ruler, your child probably already knows about this! Explain to him that there is also special paper for recording notes – with staves.
Please note that there is no need to immediately teach the child to memorize notes on the stave, first you just need to practice writing notes. The musical staff consists of five rulers, notes can be written:
A) on the rulers, putting them like beads on a string;

B) in the intervals between the rulers, above and below them;

C) in a row – on the lines and between them without gaps;

D) on additional small rulers and between them.
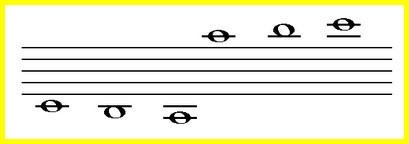
All these ways of writing notes must be tried by both the child and the adult. No treble or bass clefs are needed at this stage. True, the most important principle should be explained – high notes are located higher than low ones (the same principle of a ladder).
Stage 4 – study of the treble clef and the arrangement of notes on the staff
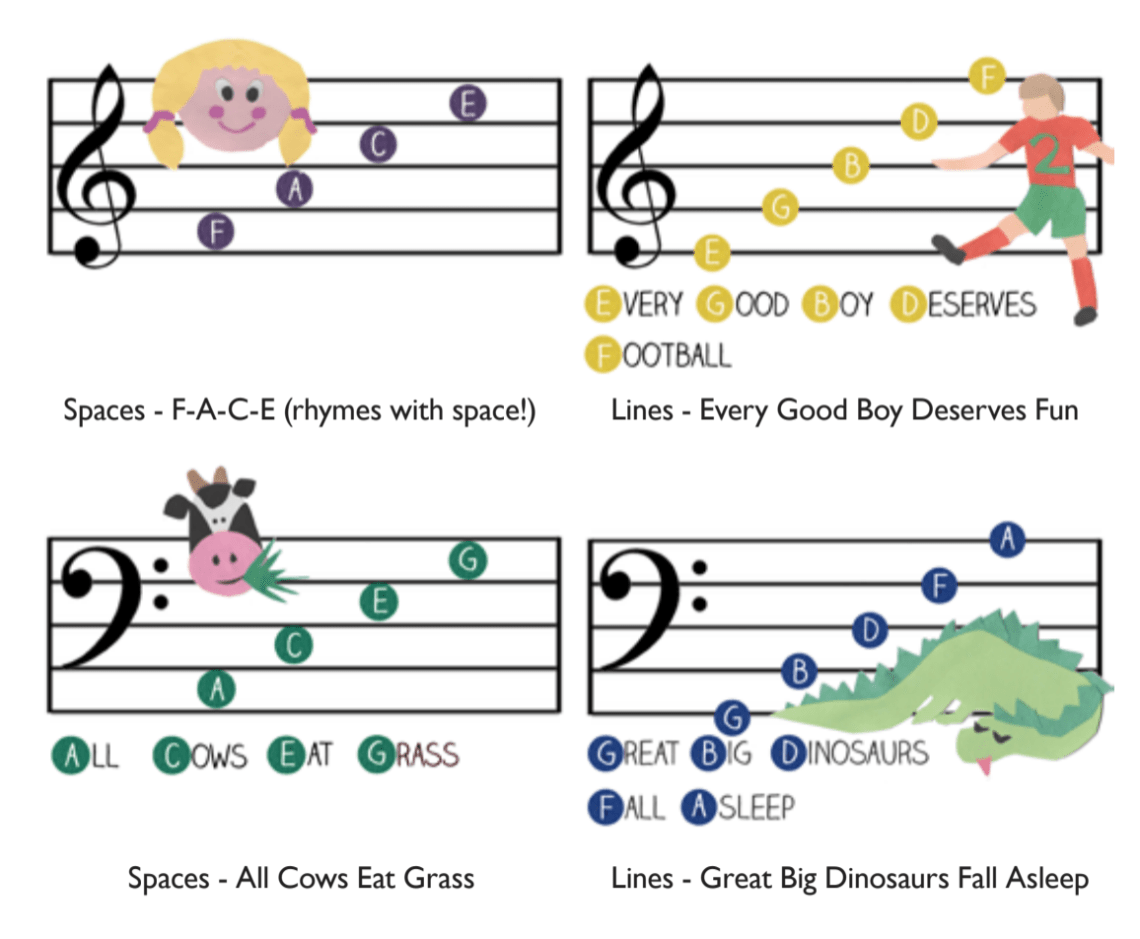
At this stage of musical literacy with a child, you can enter a treble clef. At first, you can just draw the treble clef. Along the way, it is necessary to explain that in a different way the treble clef is also called the KEY of SOL, since it is tied to the second line, that is, to the same line where the note SOL of the first octave is written.
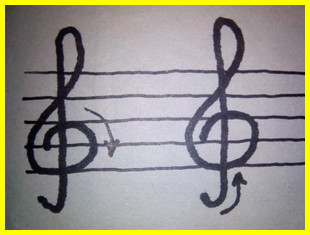
There are two ways to draw a treble clef:
- start with the second line and end with a crochet;
- start from the bottom, from the hook and end on the second line.
Both of these methods can be shown to the child, try to draw on paper and in the air, and then leave one, the most convenient way.
The next step is to study the notes on the stave, you need to start with the note SALT, which is written on the second line. And then you should again turn to the musical ladder and find out which notes are adjacent to the SALT, which are located above and below it. The same notes (FA and LA) will be the neighbors of SALT on the stave as well.
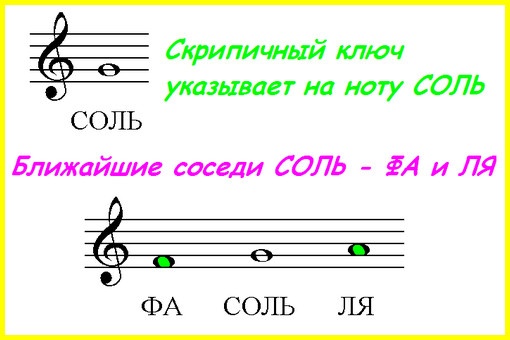
Further study of notes can be built according to the following scenario:
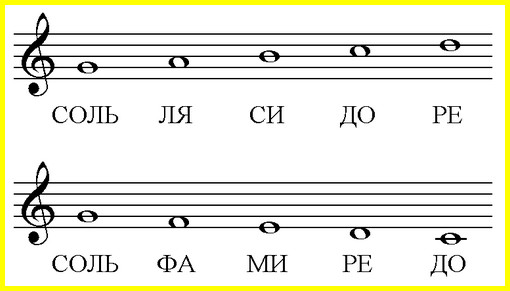
- Name and write down five notes that we will meet if we climb the musical ladder up from SALT (this is SALT, LA, SI, DO, RE). DO and PE in this case are already notes of the second octave, the possibility of moving to the next octave must be explained to the child.
- Name and write down the five notes that you will meet if you go down the musical ladder down from SOL (SOL, FA, MI, RE, DO). Here, the child’s attention should be drawn to the note DO, which did not have enough space on the stave, and therefore it is written on an additional ruler. The child must remember the note DO as an unusual note and subsequently immediately recognize it.
- Name and write down the notes of the first octave that are written on the rulers (DO, MI, SOL and SI). “Do, mi, salt, si – they sit on the rulers” – there is such a counting chant.
- Name and write down the notes of the first octave, which are written between the rulers (RE, FA, LA, DO).
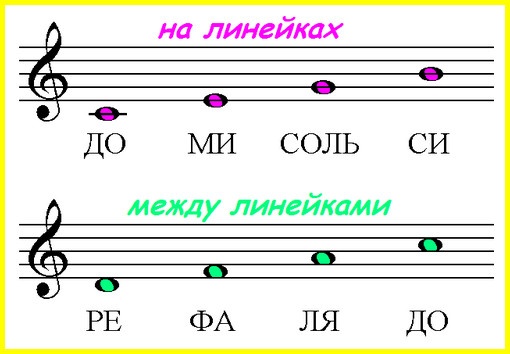
In the same way, gradually (but not on the same day and not at once) you can master the notes of the second octave. It is not worth rushing too much and straining the child with musical notation, so that interest does not disappear.
Stage 5 – work with the “musical alphabet”
What is a children’s book? The image of letters and objects whose names begin with these letters. If the development of musical notation is difficult (for example, if the child is still quite a baby at the age), then it makes sense to be distracted for a while and dilute the seriousness of the lessons with beautiful visual materials.
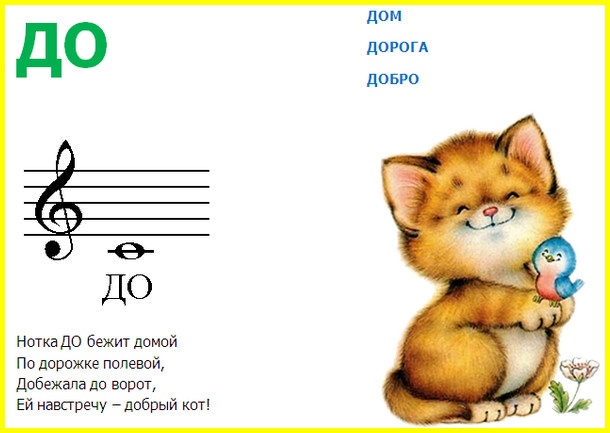
You can make a musical alphabet with your child. You can dedicate a separate sheet of the album to each note – you need to beautifully write the name of the note on it, its position on the stave next to the treble clef, and then supplement this base with something interesting – poems, words that begin with note names, drawings. If necessary, the musical alphabet can be used at earlier stages of learning.
An example of a card for the musical alphabet:
Download ready-made musical alphabet: DOWNLOAD
Stage 6 – developing the skill of reading music
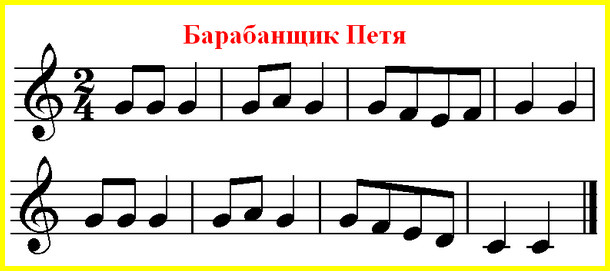
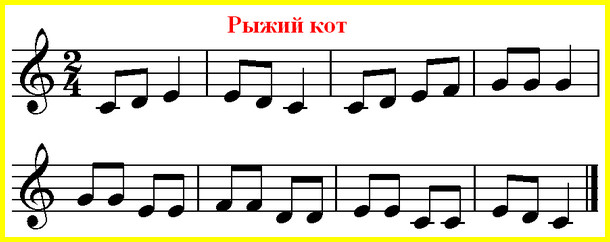
Training the skill of reading music at the initial stage of mastering musical notation should be practiced regularly. The methods of work here can be different – the usual reading of a musical text with the name of all the notes in order, rewriting the notes in a music book, signing all the notes in the melody already transferred to the notebook.
Reading examples can be found in any solfeggio textbook. As a rule, examples in solfeggio textbooks (excerpts of various melodies) are small in size (1-2 lines), which is very convenient. Firstly, the child does not get tired during the lesson and can complete the work. Secondly, it takes very little time to work through one or two numbers, which is what allows you to turn to this type of activity two or three times in one day.
Examples for reading music
Stage 7 – consolidation of knowledge
One of the ways to consolidate the learned notes can be a variety of written and creative tasks. A good selection of exciting tasks for learning and memorizing the notes of the first and second octaves is contained in the solfeggio workbook for grade 1 by G. Kalinina. We recommend that you purchase this notebook and use it in the future, since with the help of this manual in a lively and exciting way (puzzles, riddles, etc.) you can work out many important things.
A selection of tasks from the workbook of G. Kalinina – DOWNLOAD
The one who was not too lazy and worked through all the stages, turn back to the past. Now you can see the fruits of your labor. Did you manage to teach the notes to your child? Was it difficult? We think it was exciting and interesting. Please share your experience in the comments!


