Lesson 2
Contents
Music theory is impossible without musical notation. You have already seen this when you studied the steps of the scale in the first lesson. You already know that the main steps of the scale are given the same names as the notes, and you understand what a step down is, i.e. notes.
This is enough to start learning musical notation from scratch. If music notation is familiar to you, still review the lesson material to make sure you didn’t miss anything when you learned music notation earlier.
This is necessary so that in the future you can independently analyze the notes recorded on the stave, and navigate in tabs and chords if you come across a chord recording of a melody or tablature.
Note that most modern music sites often offer for the guitar exactly chords or tablature (tabs) for a song, rather than a traditional notation on a musical staff. For novice musicians, you need to clarify that chords and tabs are the same notes, only written in a different form, i.e. in a different kind of musical notation, so learning the notes is a must. In general, let’s get started!
Who invented the notes
Let’s start with a little historical digression. It is believed that the first person who came up with the idea of u11buXNUMXbdesignating the pitch with signs was the Florentine monk and composer Guido d’Arezzo. This happened in the first half of the XNUMXth century. Guido taught the monastery singers various church chants, and in order to achieve a harmonious sound of the choir, he came up with a system of signs indicating the pitch of the sound.
These were squares located on four parallel lines. The higher the sound needed to be made, the higher the square was located. There were only 6 notes in his notation, and they got their names from the initial syllables of the lines of the Hymn singing John the Baptist: Ut, Resonare, Mira, Famuli, Solve, Labii. It is easy to see that 5 of them – “re”, “mi”, “fa”, “sol”, “la” – are still used today. By the way, the music for the anthem was written by Guido d’Arezzo himself.
Later, the note “si” was added to the musical row, the fifth line, treble and bass clefs, accidentals, which we will study today, were added to the musical staff. In the Middle Ages, when letter notation was born, it was customary to start the scale with the note “la”, which was assigned the designation in the form of the first letter of the Latin alphabet A. Accordingly, the note “si” following it got the second letter of the alphabet B.
The modern understanding of the scale and its main steps developed in the 17th century, and the sound, corresponding in height to B-flat, was for a long time considered the basic element of the musical system, i.e. neither low nor high. Today, the notation system in the form of C, D, E, F, G, A, B is considered generally accepted. Although the designation of the note “si” in the form of H can also be found. We have already begun and will continue to study the systems of notation and notation of notes on the stave, adopted in the modern world of music.
Mood not on notnom stane
You already know that a note is a musical sound. Notes differ in pitch, and each note has its own designation. You also already understood that the stave is 5 parallel lines on which the notes are located. Each note has its own place. Actually, this is how you can identify notes by looking at the notation in the stave. Now let’s combine this knowledge and see what a stave looks like with notes in the most general way (do not look at the icons on the left yet):
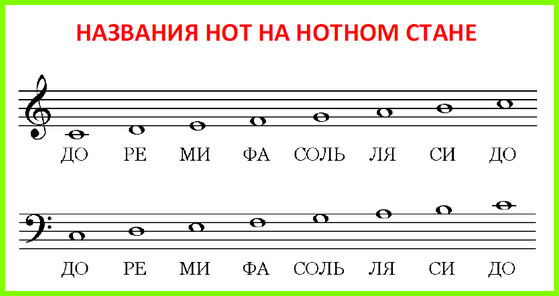
stave (aka staff) – these are the same 5 parallel lines that you see in the picture. The circles on the notes are the symbols for the notes. On the top staff you see the notes for the 1st octave, on the bottom – the notes for the small octave.
The starting point in both cases is the note “to” of the 1st octave, and an additional ruler is provided for it. The difference is that on the top staff, the notes go from bottom to top, so the “C” note of the 1st octave is at the bottom. On the lower staff, the notes go from top to bottom, so the C note of the 1st octave is on top.
However, we remember that musical sounds cover a much larger range than the small and first octaves. Therefore, to get a complete picture of the arrangement of notes on a stave, you need to study more detailed diagram note placement:
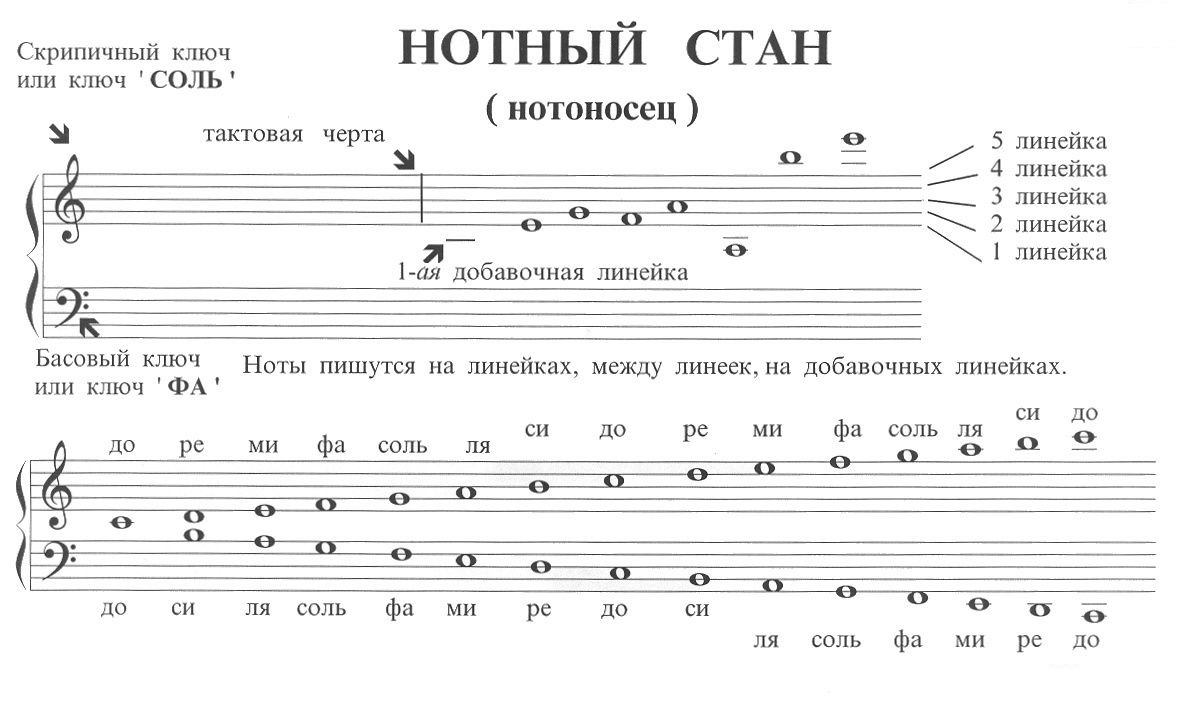
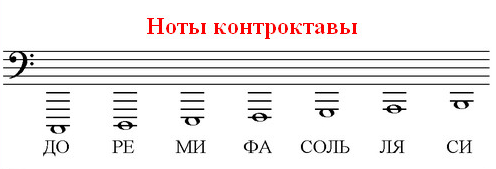
The most attentive of you have seen that even in the detailed diagram we do not see all octaves. To see the correct arrangement of all the notes, we again need additional rulers. See what it looks like on the example of a counteroctave:
And now you are ready to learn the location of all the notes on the stave. For convenience, let’s coordinate the image of the musical staff with the piano keyboard, which you already had time to consider when you went through lesson number 1. Notice where the first C note of the 1st octave is in relation to the top and bottom staff lines. We marked her in red:
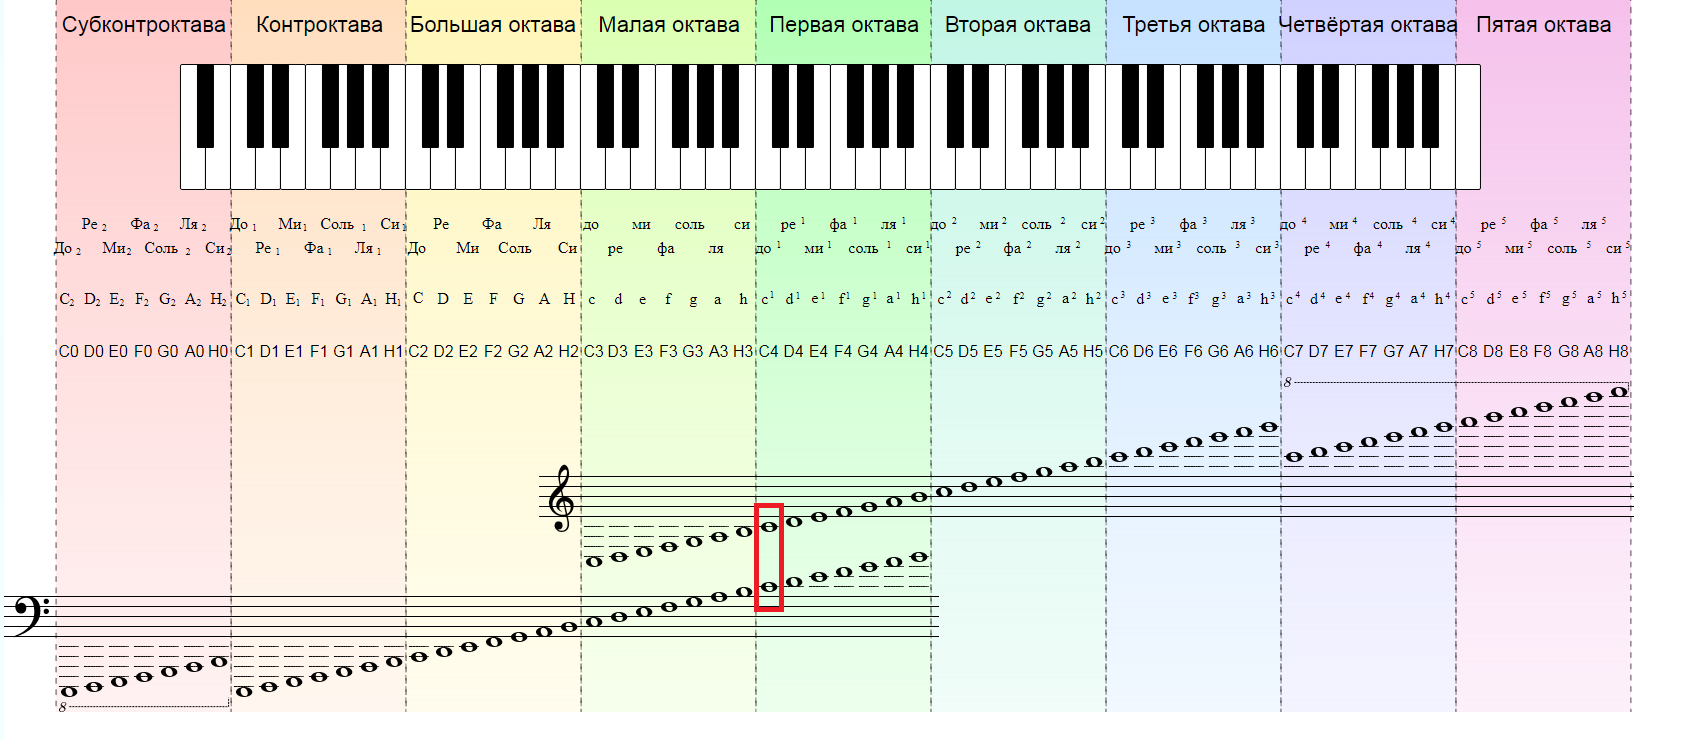
For most of those who see this whole picture for the first time, the question arises: how to remember it ?!.. In general, you only need to remember the location of the first note “to” the 1st octave, and all other notes are a certain logical sequence relative to the first note “to”.
The exercise “Lezginka” will help to more easily memorize notes. Surprisingly, it has nothing to do with music, but is intended to develop the coordination of the work of the right and left hemispheres of the brain in children [A. Sirotyuk, 2015]. Imagine that a fist or palm with clenched fingers is a circle to indicate a note, and a straight hand that rests on the middle of the edge of the palm is extension ruler note bearer:
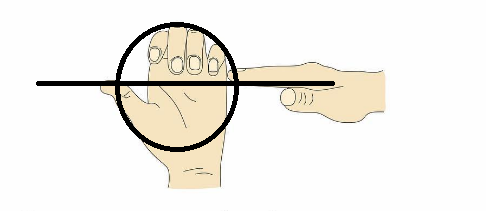
So you remember that the additional ruler cuts the circle in half, denoting the note “to”:
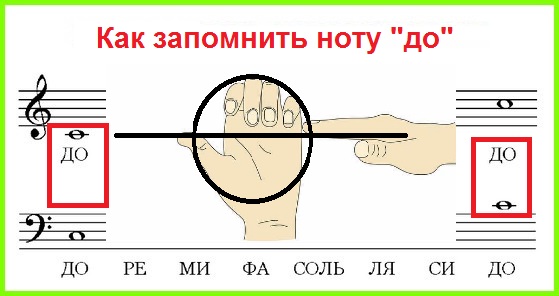
Further it will be easier. The note “D” can be represented as a fist located above an outstretched brush. The next note “mi” will be cut in half by an elongated brush, but the brush will no longer depict an additional line, but the lower of the five lines of the staff. For the note “F” we raise the fist above the line, and cut the note “G” with an elongated brush, which now depicts the second line from the bottom of the staff. I think you understood the principle of constructing notes. Similarly, you can line up notes that go down relative to the “to” of the 1st octave.
If you want to learn special mnemonics that will help you remember any information, sign up for our Mnemotechnics course, and in a short time (a little more than a month) you will understand that you have no memory problems. There are only more effective memorization techniques than those that you have used before.
So, with the arrangement of notes on the stave, we think, in general, everything is clear. The most attentive have already noticed that with the arrangement of notes discussed above, the places for sharps and flats, i.e. raising and lowering the note, no longer remains. And for this we need accidentals in notes.
Alteration Signs
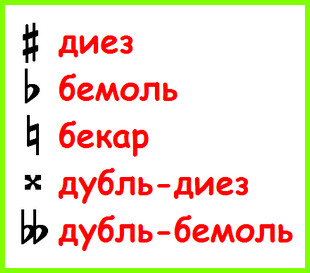
At the end of the previous lesson, you have already learned the sharp (♯) and flat (♭) symbols. You have already understood that if a note rises by a semitone, a sharp sign is added to it, if it falls by a semitone, a flat sign is added. So, a raised G note would be written as G♯, and a lowered G note as G♭. Sharp and flat are called signs of alteration, i.e. changes. The word comes from the late Latin alterare, which translates as “to change.”
An increase of 2 semitones is indicated by a double, i.e. double-sharp, a decrease of 2 semitones is indicated by a double, i.e. double flat. For double-sharp there is a special icon that looks like a cross, but, because it is difficult to pick it up on the keyboard, the notation ♯♯ or just two pound signs ## can be used. To designate a double flat, they write either 2 signs ♭♭ or the Latin letters bb.
To indicate the rise or fall of a note on a musical staff, the sharp or flat sign is located either immediately before the note, or, if one or another note needs to be lowered or raised throughout the work, at the beginning of the staff with notes to the work. For cases where a change in note is provided throughout the entire work, the symbols of sharps and flats are assigned certain places on the stave:
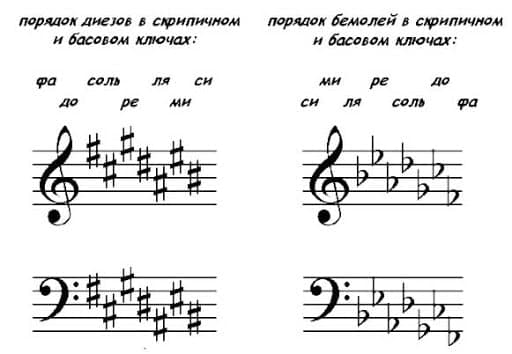
Let’s clarify for the inscription in the picture that the phrase “in the treble clef” means the staff for notes of 1-5 octaves, and the words “in the bass clef” – the staff for all other octaves from small to subcontroctave. A little later we will talk about the treble and bass clef in more detail. For now, let’s talk about how to remember the location of sharps and flats on the staff.
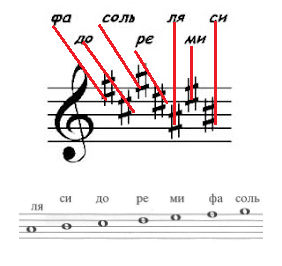
In principle, this is not difficult if you have managed to learn the location of the icons that represent notes. So, the sharp sign is located exactly on the same line of the staff as the note that needs to be raised. For the staff in the treble clef, you need to remember where the notes are in the range from “A” of the 1st octave to “G” of the 2nd octave, and you will easily understand pattern of placement of sharps:
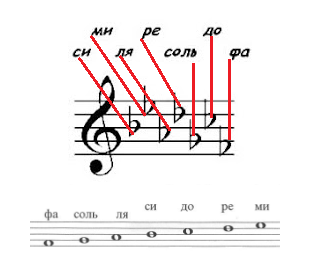
Exactly the same pattern is observed in the arrangement of the flats. They are also on the same lines as the notes to which they refer. Notes in the range are used here as a guide. from “fa” of the 1st octave to “mi” of the 2nd octave:
With sharps and flats in the bass clef, absolutely the same patterns apply. For orientation in sharps, you should remember the location of the notes from “salt” of a small octave to “la” of a large octave:
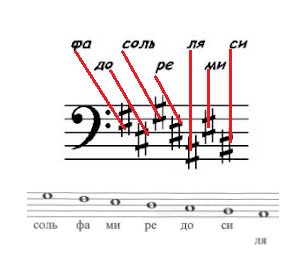
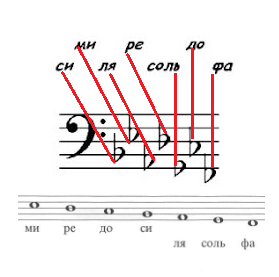
For orientation in flats, you need to remember the location of the notes from “mi” of a small octave to “fa” of a large octave:
As you have already noticed, for the arrangement of sharps and flats at the beginning of the work near the clef – treble or bass – only the main rulers of the staff are used. Such accidentals are called key.
Accidentals that refer to only one note are called random or counter, act within one measure and are located immediately before this note.
And now let’s figure out what to do if you need to cancel the sharp or flat, set at the beginning of the stave. Such a need may arise during modulation, i.e. when changing to another tone. This is a fashionable technique often used in pop music, when the last chorus or verse and chorus are played 1-2 semitones higher than the previous verses and refrains.
For this, there is another accidental sign: bekar. Its function is to cancel the action of sharps and flats. Bekars are also divided into random and key ones.
Backer functions:
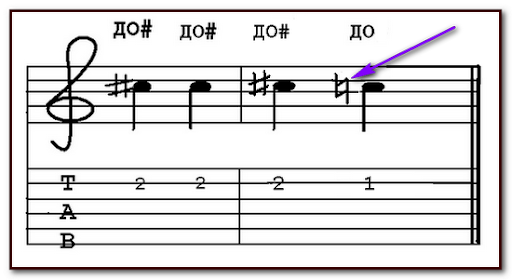
To make it clearer, see where it is located random backer on the stave:
Now look where key backerand you will immediately understand the difference:

Let’s clarify that notation on the stave is used for the guitar and piano, and any other musical instruments, but the tabs that you see in the previous picture under the stave are used for the guitar.
Guitar tabs have 6 lines according to the number of guitar strings. The top line indicates the thinnest string, which will be the bottom if you pick up the guitar. The bottom line means the thickest guitar string, which is the top string when you hold the guitar in your hands. The numbers indicate on which fret to press the string on which the number is written.
In relation to the illustration on a random backer, we see that at first it was necessary to play “c-sharp”, which is exactly on the second fret of the 2nd string. After the bekar, i.e. canceling the sharp, you need to play a clean note “to”, which is on the first fret of the 2nd string. The final lesson of our course will be devoted to playing various musical instruments, including the guitar, and we will tell you how to easily memorize the location of notes on the guitar fretboard.
Let’s sum up and bring together all the information on accidentals in the following picture:
If you already know how to play a musical instrument, and now you decide to improve your theory, we recommend reading paragraph 11 “Signs of alteration” in Varfolomey Vakhromeev’s textbook “Elementary Theory of Music”, where there are examples of parsing musical notation [V. Vakhromeev, 1961]. We are moving on to fulfilling the promises made earlier and will tell you what the keys are in relation to the stave.
Keys on the stave
We have previously used the phrases “in the treble clef” and “in the bass clef”. Let’s tell you what we mean. The fact is that a certain pitch is conditionally assigned to each of the lines of the staff. In view of the fact that there are many musical instruments in the world that produce a variety of sounds, some “reference points” of pitch were needed, and their role was given to the keys.
The key is written out so that the line from which the countdown starts crosses it at the main point. In this way, the key assigns to the note written on this line the exact pitch, relative to which the pitch and names of other sounds are counted. There are several types of keys.
Keys – list:
Let’s let’s illustrate:

Note that once there were more “Before” keys. The key “Do” on the 1st line was called soprano, on the 2nd – mezzo-soprano, on the 5th – baritone, and they were used for vocal parts according to the indicated ranges. In general, different clefs in the notes are needed in order not to make additional staff lines in excessive quantities and to facilitate the perception of notes. By the way, to make it easier to read music, a number of additional notations are used, which we will talk about now.
Duration of notes
When at the 1st lesson we studied the physical properties of sound, we learned that for a musical sound, its duration is an important characteristic. Looking at the staff, the musician must understand not only what note to play, but also how long it should sound.
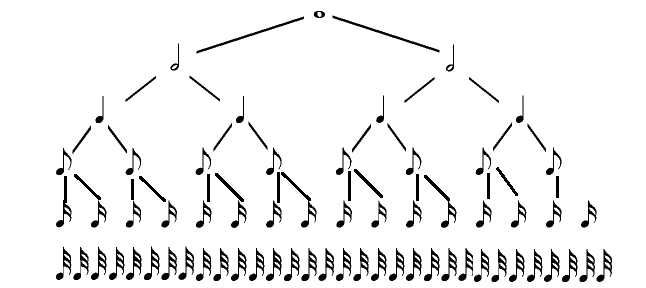
To make it easier to navigate, note circles can be light or dark (empty or shaded), have additional “tails”, “sticks”, “lines” and so on. Looking at these nuances, it is immediately clear whether this is a whole note or a half note, or something else. It remains to figure out what “whole” note, “half”, etc. means.
How to calculate duration:
| 1 | whole note– stretches for a uniform count of “times and 2 and 3 and 4 and” (the sound “and” at the end is mandatory – this is important). |
| 2 | half– stretches for the countdown “one and 2 and”. |
| 3 | Quarter – stretches for “once and”. |
| 4 | Eighth– stretches for “time” or for the sound “and” if the eighths go in a row. |
| 5 | sixteenth– manages to repeat twice on the word “time” or on the sound “and”. |
It is clear that you can count at different speeds, so a special device is used to unify the count: a metronome. There, the distance between sounds is clearly calibrated and the device, as it were, counts instead of you. Now there are countless programs with the metronome function, both independent and having this option as part of other mobile applications for musicians.
On Google Play, you can find, for example, the Soundbrenner metronome program, or you can download the Guitar Tuna guitar tuning program, where in the “Tools” section there will be “Chord Library” and “Metronome” (do not forget to allow the application access to the microphone). Next, let’s figure out how the duration of the notes is indicated.
Durations (notations):
It seems that the principle is clear, but for clarity, we offer you the following illustration:
If the 8th, 16th, 32nd notes go in a row, it is customary to combine them into groups and not to “dazzle” with a large number of “tails” or “flags”. For this, the so-called “rib” is used. By the number of edges, you can immediately understand which notes are combined into a group for losing.
Combining notes into a group:
That’s how it looks:
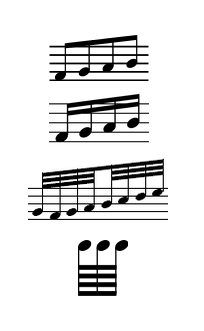
Normally, notes are combined within a measure. Recall that the beat is the notes and their accompanying signs between two vertical lines, which are called stroke lines:

As you noticed, the calm can look up or down. There are rules here.
Calm direction:
More detailed information about the duration of notes can be found in Vakhromeev’s “Elementary Theory of Music” [V. Vakhromeev, 1961].
And, finally, in any melody there are sounds and pauses between them. Let’s talk about them.
Pauses
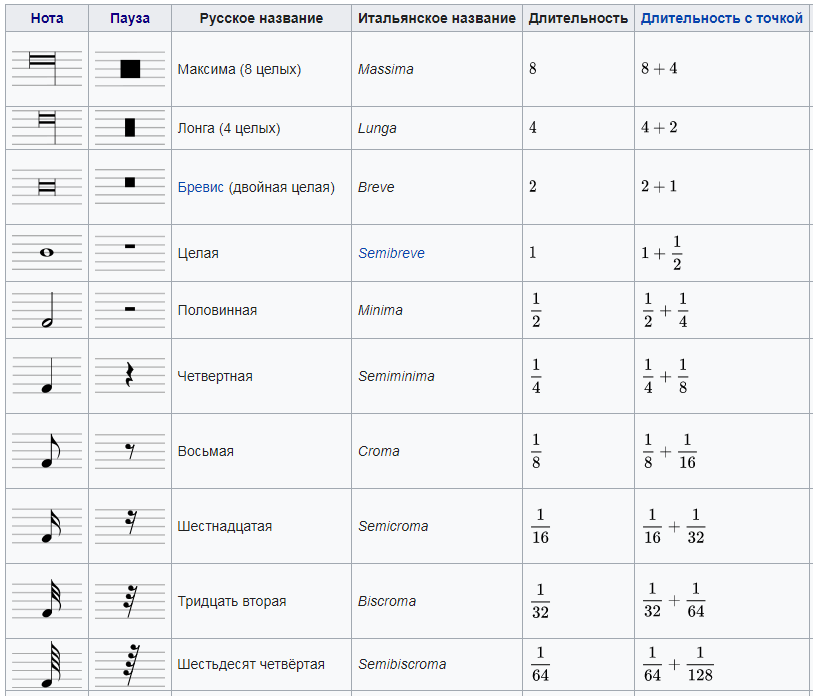
Pauses are measured in the same way as note durations. A pause can be exactly the same as a whole, half, etc. However, a pause can last longer than a whole note, and special names have been invented for such cases. So, if a pause lasts 2 times longer than a whole note, it is called a brevis, if it is 4 times longer, it is a longa, and 8 times longer, it is a maxim. A complete list of titles with designations can be found in the following table:
So, in today’s lesson, you got acquainted with musical notation from scratch, got an idea about accidentals, writing notes, designating pauses and other concepts related to this topic. We think that this is more than enough for one task. Now it remains to consolidate the key points of the lesson with the help of a verification test.
Lesson comprehension test
If you want to test your knowledge on the topic of this lesson, you can take a short test consisting of several questions. Only 1 option can be correct for each question. After you select one of the options, the system automatically moves on to the next question. The points you receive are affected by the correctness of your answers and the time spent on passing. Please note that the questions are different each time, and the options are shuffled.
And now we turn to the study of harmony in music.


